|
<< Click to Display Table of Contents >> Ground Image Control usage |
  
|
|
<< Click to Display Table of Contents >> Ground Image Control usage |
  
|
A simple example showing how to use ground image is to import an image where a building roof is visible. The user set first the upper left corner of the building roof as origin (X1), then the upper right corner as X2 and finally set the distance between X1 and X2. After the transformation is applied, the roof upper left corner is moved to shading scene origin, the roof upper border becomes horizontal and the scale matches the shading scene grid. Now the user can easily add PV and shading objects on the roof.
Definition of ground image transformations:
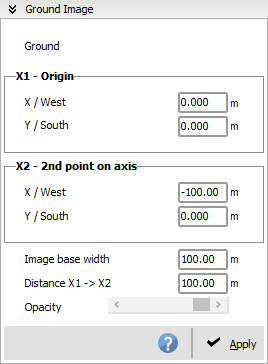
The Ground Image control User Interface allows to easily set the points and distance between them:
1) The user first set the position of ground image origin (named X1) by moving the mouse and pressing its left button.
2) Once X1 position is set, the user set the position of second point on X axis (named X2) again by moving mouse and pressing its left button
3) Finally the distance between X1 and X2 is set by selecting the related edit box in Ground Image control dialog.
Note that you can use the 3D Editor zoom control to set X1 and X2 position with more precision.
It's also possible to move X1 and X2 using the arrow keys together with <Shift> and/or <Ctrl> key. You can change the point to move by selecting X1 or X2 related edit boxes.
Applying ground image transformations:
The transformations are applied to the ground image once the check box "Apply" is selected.
Disabling this check box allows to display back the original image and edit X1/X2 position and distance again.
Additional information:
The Ground Image edition panel is shown in the right panel when a ground image is currently being edited.

The file used to import ground image will be copied in user workspace (in directory "Shadings") as soon as the user saves the shading scenes or his project.