Orientations management window
The orientations management dialog can be opened from the shadings scene by clicking on the menu Tools -> Orientations management or by pressing Shift+Ctrl+O.
 Orientations
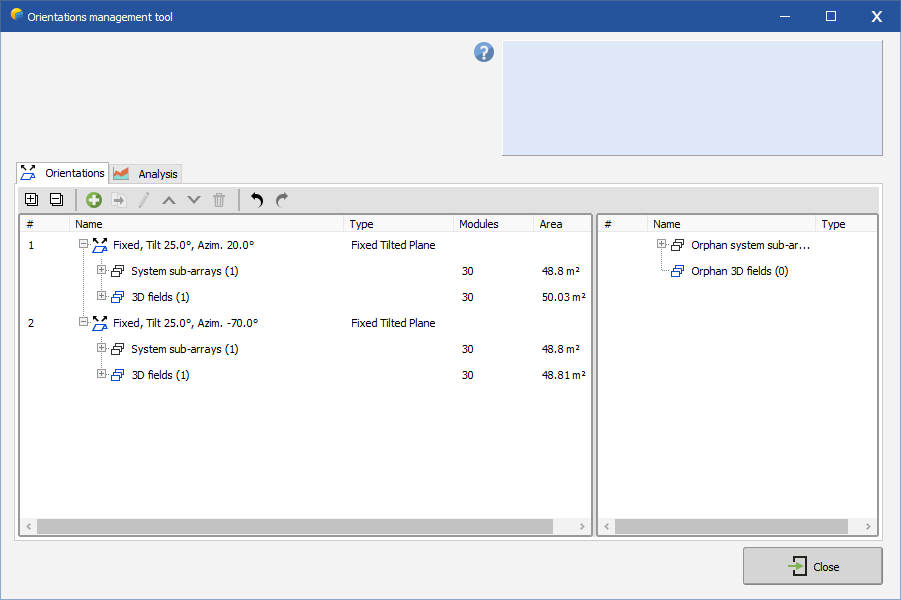
The Orientations tab provides a comprehensive overview of all current orientations within the system and their corresponding shading configurations.
On the left side of the window, orientations are organised in a hierarchical tree structure. Each orientation can be expanded to reveal its associated system sub-arrays and 3D fields, displayed at the child level. This setup makes it easy to verify the consistency between the number of modules defined in the system subfields and those configured in the 3D scene.
You can also add or remove orientations and easily move fields between orientations using drag-and-drop functionality.
When you select one or more orientations from the tree, the corresponding fields will also be highlighted in the shading scene, ensuring a clear visual reference.
When you remove an orientation, the associated sub-arrays and 3D fields will become orphaned and appear in the right section of the window.
You can then drag and drop these fields to the left side to reassign them to the appropriate orientation.
Deleting an orientation
To delete an existing orientation, select the orientation and click on the ![]() icon.
icon.
Keep in mind that this action will only delete the orientation itself, not the associated system sub-arrays or 3D fields. The associated elements will appear as orphaned on the right side of the screen. You will need to reassign them to another orientation by dragging them from the right side to the appropriate branch of the orientation tree on the left.
Adding a new orientation
To add a new orientation, click on the ![]() button above the list. This will open the orientation editing window, where you can configure the parameters for your new orientation.
button above the list. This will open the orientation editing window, where you can configure the parameters for your new orientation.
Modifying an existing orientation
To modify an existing orientation you can double-click on it or select it and click the ![]() button above the list. This will open the orientation editing window, where you can modify the parameters of the orientation.
button above the list. This will open the orientation editing window, where you can modify the parameters of the orientation.
Copying an existing orientation
To copy an existing orientation you can select it and click the ![]() button above the list. This will create a new orientation with the same parameters as the selected one. Please note that the 3D fields on the copied orientation are not copied and they stay assigned to their original orientation.
button above the list. This will create a new orientation with the same parameters as the selected one. Please note that the 3D fields on the copied orientation are not copied and they stay assigned to their original orientation.
Modifying the order of the orientations
If you want an orientation to appear before or after another one, you can select it and click on the ![]() or
or ![]() buttons to move it up or down the list.
buttons to move it up or down the list.
Assigning fields to an existing orientation
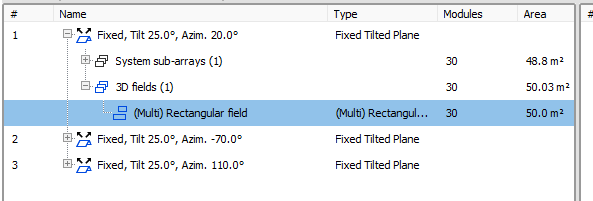
To change the orientation assignment of a field already associated with an existing orientation, or to assign an orphaned field to a new orientation, simply drag and drop the field to the desired orientation:
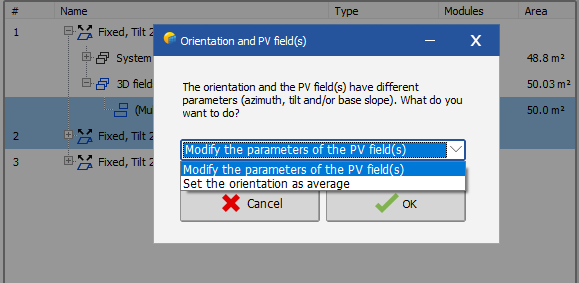
After dragging a field to a new orientation and if the orientation is not average and its parameters are not compatible with the field parameters, PVsyst will prompt you to choose whether to update the field's azimuth, tilt, and base slope properties to match the new orientation, or to set the orientation as "average":
If you choose "Set the orientation as average," the field's azimuth, tilt, and base slope properties will remain unchanged. The orientation will be treated as an average orientation. For more information, refer to the section Average orientation. Select the option that best fits your needs.
It is possible to drag-and-drop the "3D fields" node from one orientation to another one. This will assign all 3D fields of the first orientation to the second orientation, leaving the first orientation empty.
It is possible to select multiple fields at once and move them all together to a new orientation. However it is not always easy to select all the desired fields from the tree. An easier way to do it is to select all the desired 3D fields in the shading scene and then open the "Management of objects" tool with Ctrl+G. There you will be able to select the new orientation for one field and it will be applied to all selected 3D fields.
 Analysis
This part shows orientations spread and values for several types of data, like plane orientations, deviation around average and azimtuh/tilt according to baseslope.
The average values are also computed and shown in the Analysis panel at the right.


